
The writing software in iXOS-JUKEMAN can transport the data to be written to a CD, PD, WORM or MO recorder drive. To actually burn a disk, you need the writing software cdglow together with iso9660, the latter used to generate the required standard ISO 9660 file system. Windows NT also supports the burning of disks from the GUI.
Please
read the following before attempting to burn a disk:
Burning disks requires a steady stream of data at a constant rate. CD recorders
which operate at the basic speed require a data transfer rate of 150 kB per
second. With dual- and quad-speed recorders, the required data transfer speed
is 300 and 600 kB per second respectively. If the data available in the
internal buffer of the CD recorder is not sufficient to maintain this rate,
then the burning process is prematurely interrupted with the SCSI error
message: "buffer underrun" and the CD can no longer be used.
iXOS-JUKEMAN is designed to fully exploit the features of the controlled
devices. However, it cannot compensate for an insufficent hardware set-up or
operating errors.
The following errors typically cause such buffer underrun errors:
* If the data source is not directly connected to the jukebox, i.e. if the
data is being transferred over a network.
* If you are copying data from a CD drive, whose speed is the same or less than
that of the recorder drive. An example of this is if you copy data from a
quad-speed to the Yamaha CDE 100 II with variable speed capability. In this
case however, it is possible to reduce the effective recording speed with the
cdglow options -f1 and -f2.
Another cause of error is when there are too many devices attached to the
same SCSI controller as that used by the CD recorder. Some recorders cannot
even operate if there are other devices attached to the same controller. In
this case it is required to use separate controllers for the read drives and
the recorder drive. In some cases, however, this problem can be avoided by
giving the recorder drive a higher priority (e.g. 6) than the other drives.
In addition to this, no activites or real-time processes, which would overload
the hard disk or SCSI busses, should be allowed to run while burning a CD.
If you are unsure about the properties of a device, the cdglow command
should be run with the option -p. Though it is usually not possible to
simulate the laser performance, this option allows the recording process to be
simulated and whether buffer underrun error is likely to occur. If this is the
case, either the buffer can be enlarged or the speed of the CD recorder can be
reduced with the options -f2 or -f1. If you plan to copy a
CD, it is also possible to copy the contents first to the hard disk to the ISO
9660 standard. The write command will then use this file as the source.
The actual write command is as follows:
cdglow [-p] [-v] [-w] [-c] [-f1|-f2] [-b size]
[-s source] [-t
target] [-l length] [-a size]
With this command, the data is is written to the CD (WORM or MO) in ISO 9660 format on a single track.
-p |
preview mode: data is received but not burned |
-v |
on completion, verify that there are no differences between the source data and what actually now appears on the CD. |
-w |
write to WORM and MO. |
-c |
only check the size of the source. |
-f1 |
single-speed recording-the default is the highest possible speed. |
-f2 |
dual-speed recording |
-b <size> |
size of the RAM buffer (in decimal or hexidecimal) -default is 8 MB. |
-s <source> |
<source> contains the ISO 9660-file system - default is stdin. |
-S |
indicates that the source is not a SCSI device. |
-t <target> |
<target> is the CD recorder - default is stdout. |
-T |
indicates that the target is not a SCSI device. This mode allows up to 128 KB to be written to the hard disk without a licence. |
-l <length> |
indicates how many bytes should be written.- default is the whole ISO image. |
-a <size> |
the granularity of the control-output, which determines the frequency with which confirmation messages are output when recording data - default value is 1 MB, which corresponds to -a 0x100000. This means that for every megabyte of data written to the CD, a message will be output. The actual value provided for <size> will be rounded up to the nearest MB. If <size> is set to 0, then no messages are output. |
Successful completion of the cdglow command is confirmed by the return
code 0: other values indicate that an error occurred. Such errors are
protocolled in stderr.
When working with UNIX, the cdglow command must either be run under
root or have its s-(,,sticky"-) bit set. Otherwise the speed of the
data stream is not properly maintained. The equivalent user under NT is
Administrator.
A variety of data sources can be used for cdglow, an example of which
is a file or partition with a master image formatted to ISO 9660, or another CD
drive. In the latter case, it is possible to copy the contents of one CD onto
another, providing the speed of the recorder is slower than that of the
source.
A more advanced application is, while producing the ISO 9660 file system, to
pipe this file system simultaneously to cdglow. The software is
optimized, so that the real-time capabilities of the operating system are fully
exploited to maintain the constant rate of data transfer. This is also the case
when the source data is dynamically generated. The precautions mentioned above
must still be observed, however.
It is important to be aware that certain drives in the IMS range simulate
("-p") the burn process so accurately, that successful completion of
such a simulation requires opening and closing the mail slot, or removing and
re-inserting the caddy. This is necessary to simulate the actual removal of the
CD during a genuine recording. During an actual genuine burning of a CD, the
door of the drive should of course not be opened. This is also the case for a
simulated recording process with the above family of drives and to prevent the
door being opened by mistake, the relevant functionality is deactivated during
a simulation. However, should the simulation not be successful, it is sometimes
necessary to turn the recorder drive off and on again in order to be able to
remove the disk. CD recorders in this range include a variety of drives from
Grundig, Hewlett Packard, Kodak, Matsushita, Philips, Pioneer, Plasmon and
Yamaha.
iso9660
is program which formats a file system to the ISO 9660 standard. This allows
the use of the Rock Ridge extensions, which contain information about UNIX file
names and permissions. A file system resulting from this program can be written
to its own partition or file before it is burned onto disk. Alternatively,
depending on the hardware (see above), it can be channelled directly to
cdglow, whereupon the need for such a large interim storage is
avoided. In either scenario changes to the source file system should be avoided
while iso9660 is running and ensure that the target file system does
not share the same directory path of another image produced by an earlier
running of the program.
Typically, a Level 1 ISO 9660 file system is generated, in which the file names
are converted to conform to the standard 8.3 convention. A limitation of this
convention is that only capital letters, numbers and underscores can form such
a file name. This is however necessary to provide a file system which is almost
universally accessible and readable.
iso9660 is not limited to this convention, however, and with
appropriate parameters certain extensions are permissable. This will of course
have the effect, that not all operating systems will be able to read the files,
especially if iXOS-JUKEMAN is not installed on the operating system in
question. For this reason, it is advisable to carry out tests before burning
CD's whose file systems exploit this feature.
rr
This parameter allows the Rock Ridge extensions to be added to areas which are
not occupied by ISO 9660. As a result, the image contains an ISO 9660 file
system with additional POSIX properties, which can then be processed by file
systems able to understand these rr extensions. The added advantage of
this system is that the source documents can be named arbitrarily, as both the
converted ISO 9660 names together with the rr names now reside on the
target disk.
joliet
Writes
a disk in Joliet format (Unicode-support, long filenames).
isolevel2
Permits the use of file names up to 31 characters long, corresponding to ISO
9660 Interchange Level 2. Level 1 allows only the 8.3 format for normal
files.
fitcd
With this parameter it is possible to check if the size of a resulting image
would be greater than the storage capacity of a 74-minute CD (650 MB). Should
this be the case, the program discontinues, thus preventing an image being
generated that would not actually fit onto a CD.
If the output from iso9660 is piped directly to cdglow this
parameter is not necessary, as the latter carries out a similar check before
writing to the CD and will not start if the image would be too big.
maxsize=<bytes> (decimal oder hexadecimal)
This parameter has the same functionality as `fitcd', except that it
is possible to state the required limit explicitly. This is particulary
important, e.g., for 63-minute CD-Rs, whose capacity is only 553 MB. When
`fitcd' and `maxsize=<bytes>' are used together,
only the value of `maxsize' is considered.
followlinks
Used to support UNIX symbolic links.
norelocation
Allows the use of rr directories which are deeper than 8 levels, which is the
standard limit of ISO 9660.
ignorefail
Replaces unreadable files or directories with empty equivalents.
checkfail
Excludes unreadable files or directories from the image.
source=<path>
Indicates the path of the root directory.
stdout=<file> und stderr=<file>
Specifies the file name of the ISO 9660 image and the file name for error
messages. If not specified, the data is written to the relevant data streams
stdout and stderr.
name=<volume_name>
Sets the name of the medium, which is stored in the so-called "primary volume
descriptor". To avoid problems, no white space should appear in this name.
publisher="Text", preparer="Text",
applid="Text"
Specifies the publisher, the preparer and the application ID.
ignore=<chars>
This allows certain files to be excluded from the image. The program considers
the original file names as though the string <chars> were removed.
If the reslultant name is the same as that of a file which already exists, then
the original file is ignored and does not appear in the image. If this value is
set to ~, e.g. then the file ~source.c is excluded from the
image if there already exists a file source.c. Should no such replica
file names be found, then this parameter has no effect.
exclude=<path>
Allows a sub-directory to be excluded from the image.
replace=@<path1>@<path2>
Allows a sub-directory branch to be inserted or replaced.
To write both source directories /y and /z to a disk, create
an empty directory /x and call
iso9660 source=/x replace=@/x/y@/y replace=@/x/z@/z
This will create a CD with the subdirectories y and z and
their contents. This option provides lots of possibilities. This feature can be
tested conveniently with hard disk images (see "Disk images on hard disk" on
page 220).
With the following option, you can include all the necessary options in one
file:
options=<file>
Each line of this file should contain only one option. By default, the files
.iso9660 und iso9660.ini are used to store such options.
It
must be emphasized that the use of the following options will lead to ISO 9660
images which will not be fully readable by all operating systems.
longnames
Permits the use of long file names.
nicenames
Allows any character to be used to construct the file name. However, it is
better to use the option allow=<charlist> (see below).
noversion
Suppresses the version number.
dir.ext
Permits the use of `.xxx' extensions to directory names.
omit.
Suppresses the trailing period ( . ) of ISO 9660 file names.
.by_
Replaces leading periods ( . ) with underscores ( _ ).
allow=<charlist>
By default, standard ISO 9660 permits only the use of capital letters, numbers,
periods and underscores. Small letters must therefore be capitalized and any
characters which are not allowed are converted to the underscore.'_'.
This option allows you to extend the list of characters which can appear in the
resultant image. An example is allow=-~ which allows both of these
characters to appear in file names. By using allow=all or
allow=ALL it is possible to prevent any conversion from taking place.
This should not be confused with the option nicenames; which has a
more extensive effect as it ignores a number of ISO 9660 conventions, e.g., the
version number. For this reason it is preferable to use allow=all
instead of nicenames.
Consider a CD recorder which is connected to the first SCSI bus with the ID 6. It will therefore be addressed by \\.\p0b0t6 or /dev/iXOS_SCSI0/6. These values can be checked out with the command inquiry as follows:
inquiry \\.\p0b0t6 or inquiry /dev/iXOS_SCSI0/6
This provides you with the manufacturer and the product number. As soon as you have identified the CD recorder, you can burn a CD with the follwing:
iso9660 source=\ixos | cdglow -t \\.\p0b0t6
or
iso9660 source=/ixos | cdglow -t /dev/iXOS_SCSI0/6
This generates an ISO 9660 image from \ixos (/ixos) and all subdirectories
under this directory tree and burns a CD with this image. To check the data
transfer rate, simulate the recording with the preview mode as follows::
iso9660 source=\ixos | cdglow -p -t \\.\p0b0t6
or.
iso9660 source=/ixos | cdglow -p -t /dev/iXOS_SCSI0/6
If iso9660 does not meet the necessary data transfer rate, use a
separate file or partition:
iso9660 source=\ixos > \temp\image
cdglow -s \temp\image -S -t \\.\p0b0t6
or.
iso9660 source=/ixos > /tmp/image
cdglow -s /tmp/image -S -t /dev/iXOS_SCSI0/6
where \temp\image (/tmp/image) is the target file. The
effective data transfer rate used by cdglow can then be reduced by
using the option -f1 or -f2.
The attribute of the image can be modified by a variety of iso9660
options, e.g.:
iso9660 rr name=USR1 source=\usr1 > \temp\image
or.
iso9660 rr name=USR1 source=/usr1 > /tmp/image
This example generates an ISO 9660 image from the directory tree
\usr1 (or /usr1) with Rock Ridge extensions.
CDs can also be copied, if you have a second drive, e.g., \\.\p0b0t3
or. /dev/iXOS_SCSI0/3:
cdglow -v -s \\.\p0b0t3 -t \\.\p0b0t6
or.
cdglow -v -s /dev/iXOS_SCSI0/3 -t /dev/iXOS_SCSI0/6
These commands copy one CD to another and verify the results. It is important, however, that the drive for the source CD is faster than that for the target CD. If this is not the case, then the options -f1 or -f2 should be used to lower the speed of the recording process.
cdglow
produces message which each begin with the time in hundreds of seconds. From
these messages it is possible to see, e.g., which device was found by
cdglow, how many blocks of data should be written, how much data has
already been read into the buffer, when the recording process has ended and
when the CD has been finally made ready for reading. If you use the option
-v, then an additional verification is carried out by comparing the
source and the target. Should there be a difference, the number of and identity
of the blocks which differ is output. The source and target should, of course,
be identical, but should any errors occur during the transfer of data over the
SCSI connection, it will be indicated here. If a verification is successful,
the output code should is 0.
Should an actual error occur, an error message is output. In such a case two
error messages are usually output. This arises from the fact that at the
beginning of the recording, cdglow splits into two threads to maintain
the required data transfer rate. This has the advantage that if one is
interrupted, then the other acts as a backup process.
Unlike
our Jukebox-Server, cdglow has no knowledge of jukeboxes. However, it
is possible to produce CDs with the help of this server.
Note that as of version 2.1 of iXOS-JUKEMAN, you do not need to set up two
different device description files or to change the only device description
file in order to reserve a recorder for writing, as you had to in previous
versions. Likewise, the CD-Rs you intend to write can be included in the set of
slots administered by iXOS-JUKEMAN.
First you disable the recorder drive of your jukebox for use by the file system
with the command
cdadm detach jb.dev -d 4
(see also "Command line index" on page223). This assumes that the jukebox
description file is jb.dev and that the recorder is the fourth drive
of the jukebox.
After burning the disk the drive can be reattached with the command
cdadm attach jb.dev -d 4
Next insert the recordable disks into the jukebox, which can be done using
the cdadm insert command. For more information see "Manage disks" on
page 115. Note that setting the blanks parameter (see "Server
parameters" on page 125) to a value of 2 for this purpose will speed up this
process considerably (do not forget to reset the parameter to its previous
value).
If you plan to insert a large number of CD-Rs, importing them one by one may be
time consuming. You can open the jukebox to perform the import manually. You
must, however, detach the jukebox before you can open it. After the import, and
after reattaching the jukebox, the following command must be issued:
cdadm rescan jb.dev
to update(the jukebox's memory concerning which slots are filled and which
are empty (see "cdadm rescan <device>" on page 236). The command
is only mandatory for jukeboxes with non-volatile memory, like the Pioneer
5004X or the Grundig GMS 3200 which might otherwise damage themselves. For
other types of jukeboxes this command will do no harm.
After successful import of the CD-Rs you have two options depending on whether
your want to write only one or two CDs or plan to burn a whole series.
Simply place an empty CD in the recorder drive. This is achieved by issuing a command similar to the following:
cdadm movecd jb.dev 4 9
This has the effect of moving a CD from slot 9 to the recorder drive (4) of
the jukebox (jb.dev).
The CD can now be recorded like in any other CD recorder, while still allowing
other CDs to be read. An example the required command is:
cdglow -v -s C:\temp\image.iso -S -t \\.\p1b0t5
or.
cdglow -v -s /tmp/image.iso -S -t /dev/iXOS_SCSI1/5
This command burns the ISO image onto the CD found attached to SCSI-ID 5 of
the second SCSI controller and carries out a verification.
The CD can finally be moved out of the recorder drive back into slot 9 with the
command
cdadm movecd jb.dev 4
The Cd can then be removed with the command cdadm remove jb.dev 9 or the following command can be used to include the recorded CD as part of the jukebox file:
cdadm testcd jb.dev 9
Alternatively the CD can be inserted into the device description file by inserting the slotnumber into the CD (disk=...).
Our software contains the batch script burncds.bat for Windows NT and the shell script burncds.sh for UNIX to allow several CDs to be burned from the one source. These scripts assume that the jukebox is already connected to the server, that the recorder has been appropriately reserved for the burning process and that the corresponding slots have writeable CDs. The scripts must first be tailored to the specific system configuration, however, and this is carried out with the following command:
burncds <device> <destination> <source> <slotnumbers>
or
burncds.sh <device> <destination> <source> <slotnumbers>
where <device> is the name of the device description file,
<destination> the SCSI-ID of the recorder drive and
<source> is the source data to be burned. This value is either the
SCSI-ID of another drive or the name of the file where the ISO file system
image can be found. Finally, <slotnumbers> indicates the a list of
all the slots containing the CDs to be burned.
Assuming jukebox.dev, is the device description file,
C:\temp\source.iso or /tmp/source.iso the file containing the
ISO file system image, \\.\p0b0t6,0 or /dev/iXOS_SCSI0/6 the
SCSI-ID of the recorder drive and that the CDs in slots 1 to 5 need to be
burned, then the appropriate command is:
burncds jukebox.dev "\\.\p0b0t6,0"
C:\temp\source.iso 1 2 3 4
5
or
burncds.sh jukebox.dev /dev/iXOS_SCSI0/6
/tmp/source.iso 1 2 3 4
5
Please note that the quotation marks are necessary when running the Windows
NT script. This prevents the 0 being considered as another argument, rather
than the actual LUN (in NT, the comma `,' is used to separate arguments).
If the source data is in another SCSI CD drive, e.g., \\.\p1b0t3,3 or
/dev/iXOS_SCSI1/4, and the target CDs are in the slots 17, 25 and 39,
then the following command is required:
burncds jukebox.dev "\\.\p0b0t6,0" "\\.\p1b0t3,3" 17 25
39
or
burncds.sh jukebox.dev /dev/iXOS_SCSI0/6
/dev/iXOS_SCSI1/4 17 25
39
If the syntax of the typed-in command is correct, then an output similar to the following should appear on the screen:
Burning CD in Slot 3 of jukebox.dev with source C:\temp\source.iso or /dev/iXOS_SCSI1/4
All messages from each recording are then channelled into a file of the name <Slot#>.out and, correspondingly, there will be one such output file for each slot included in the original burn command. In addition, there also exists the script makecd.bat, which is called by burncds.bat for each slot number. These files should be checked for possible errors, e.g., concerning the transport of the CDs or buffer problems. A positive indicator that everything was successful is when the files correspond to each slot have the same size or if they differ only by one or two bytes.
The
above scripts must be tailored to the system configuration before being used.
The specific lines which may need to be changed are indicated by the trailing
comment # CONFIGURE or by the leading/trailing comments rem
CONFIGURE BEGIN and rem CONFIGURE END.
Such lines in burncds.sh include:
PATH=$HOME/projects/jukeman/bin:$PATH # CONFIGURE
In the above the path $HOME/projects/jukeman/bin must be replaced with the path of the actual JUKEMAN directory.
cdadm movecd $devfile 1 $i # CONFIGURE
If the recorder drive is not the first drive in the jukebox (i.e. not the first drive which appears in the device desrciption file) you need to replace 1 with the number of the correct drive.
cdglow -v -s $jukesource $glowoption -t $jukedest # CONFIGURE
The recording itself is started with this line. Further options cdglow may also be added in here, e.g., -f1 or -f2, should the speed of the source not be high enough, or the option -b <size> in order to change the size of the recorder buffer. It is also very useful to use the option -p in order to carry out a simulation before actually executing the genuine burn jobs.
cdadm movecd $devfile 1 # CONFIGURE
Identical to cdadm movecd, which is described above.
The following line in burncds.bat should also be examined:
set jukeroot=D:\jukeman
The path D:\jukeman should be replace with the actual path of the
JUKEMAN directory (probably C:\jukeman).
In makecd.bat the following lines may need to be modified:
%jukeroot%\cdadm movecd %devfile% 1 %1
If the recorder drive is not the fist jukebox drive (i.e. the first drive listed in the device description file), then the parameter 1 must be replaced by the actual recorder drive number.
%jukeroot%\cdglow -v -b 0x400000 %glowoption% -s %jukesource% -t %jukedest%
This line initiates the actual recording process. Further options for cdglow may also be added in here, e.g., -f1 or -f2, should the speed of the source not be high enough, or the option -b <size> in order to change the size of the recorder buffer (-b 0x400000 sets the buffer to 4 MB, the default value is 8 MB).
%jukeroot%\cdadm movecd %devfile% 1
This has exactly the same effect as cdadm movecd.

Select [WRITE]-SINGLE TRACK AT ONCE.
The following dialogue box appears:
Source:

You can select one of the following sources:
ISO-Image
Choose from the selection the appropriate ISO disk image.
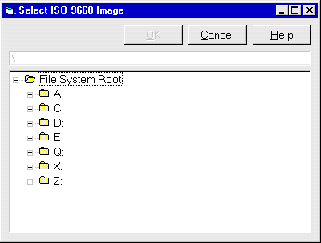
Disc Drive
Select the appropriate source drive from the list.
Jukebox
Select the jukebox, the source drive and the required slots.
FS Tree
Select a directory using FS Tree. There are a variety of sources for this
option:
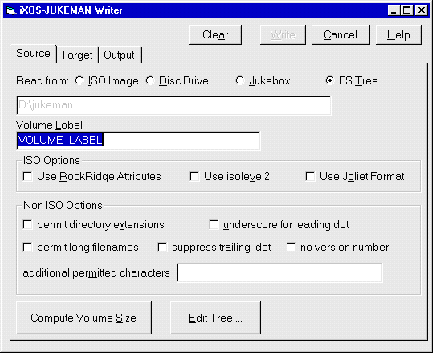
Volume label indicates what the newly-recorded disk should be called.
The ISO Options are described in sections "ISO 9660-conforming
parameters and options" on page 140 and the Non ISO Options in section
"Options and parameters which do not conform to ISO 9660" on page 142.
[COMPUTE VOLUME SIZE] can be used to find out the size of the disk to be
recorded.
[EDIT TREE] is used to exclude, insert or rename specific files or
sub-directories.:
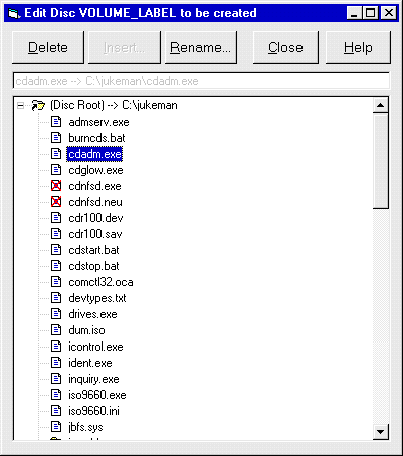
[DELETE]: Deletes the selected file or sub-directory from the tree.
The file or directory will then be marked with a red cross and be excluded from
the recording.
[INSERT]: Allows a file or sub-directory to be inserted into the tree at
a preselected point.
[RENAME]: Renames the selected files or sub-directories: this affects
the name of the file in the target, and not the actual name in the source,
which remains the same.
[CLOSE]: Applies the changes and closes the dialogue box.
Target:

You can choose one of the following targets:
ISO-Image
Select the target directory from the list provided and type in the name for the
ISO image.
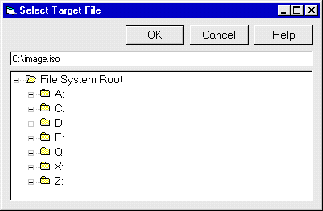
Recorder
Choose the recorder drive from the list.
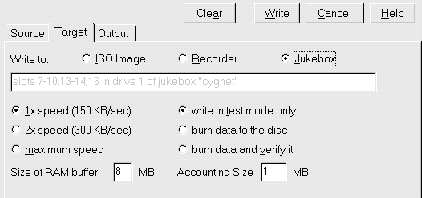
You can set the speed of the recording here (single-, dual- or maximum
speed). The option write in test mode only allows a simulation to be
carried out. Both burn data to the disc and burn data and verify
it can be used to start the recording process, in the latter case also with
a verification flag.
Jukebox
Choose the jukebox, recorder drive and required slots. From iXOS-JUKEMAN 2.2
and later versions, it is possible to select more than one slot, so that
several CD can be burned using the same source.
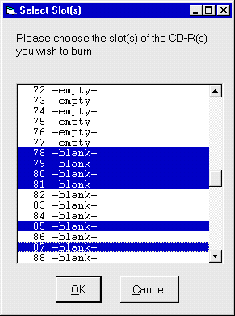
The individual slots can be selected by using the [CTRL] key or, if the
slots are consecutive, using [SHIFT].
When you have selected the Source and the Target, it is then
possible to start the recording process with [WRITE]. [CANCEL]
allows you to leave the dialogue without recording.