
Select [DEVICES]-NEW... or click [NEW...]:
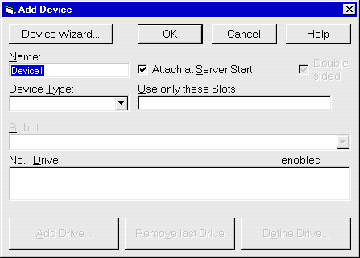
Entering the device name
Type a device name into the Name field. This name may be 8 characters
long. This will also be the name of the device description file and the save
file that will be created in the JUKEMAN directory (with the extension
.dev/.sav).
Setting up device type, drives and robot
For
a quick set-up of the device description file, the 'Device Wizard' can be used.
Many devices report their assigned SCSI IDs on request, allowing iXOS-JUKEMAN
to add the drives to the device description file automatically.
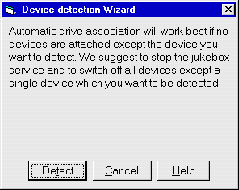
When running the automatic drive detection you should switch off all connected
jukeboxes except the one to be configured.
Click [DEVICE WIZARD] to start the drive detection. The device wizard
tries to find out as much as it can about the connected devices and to fill out
the "Device Type", "Drive" and "Robot" fields. If a device
is not detected by the device wizard, these entries must be completed by hand.
For example, all drives that could not be mapped properly appear as "undefined"
in the drives list.
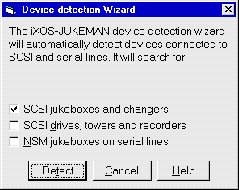
Select the device types you want the wizard to check for and click [DETECT]. Detection may take longer for serial lines.
Click [DETECT] to go on.
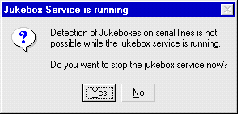
If the serial lines will be searched for devices, the server needs to be stopped. Click [YES].
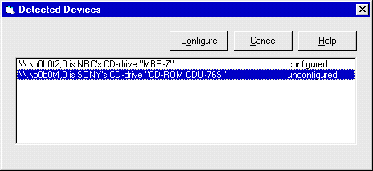
From the list of detected devices, select the one you wish to configure and
click [CONFIGURE]. The device wizard enters the values into the
appropriate fields automatically.
Attach devices automatically
Select
"Attach at Server Start" if the device should be attached automatically
at server start-up.
Using only several slots
Enter
the slots to be used in the "Use only these Slots" field. See page 60
for the syntax. If this field is left blank, all slots will be used.
Using double-sided WORMs/MOs
Select
"Double sided" to configure a WORM or MO jukebox (otherwise this field
is greyed out) with double-sided WORMs or MOs.
Add missing fields
If the device wizard failed to detect a device (e. g., if there is more than
one SCSI device with the same SCSI ID attached to different busses), the
following fields must be checked and completed:
Device Type
This is a list of all supported devices. Select your device. If you cannot find
your jukebox in the list it may be a standard SCSI jukebox (see "Table 3 -
Device types for all supported jukeboxes" on page 57).
Robot
For most device types a robot must be specified. Whether it is a SCSI-ID (most
jukeboxes) or a LUN of a SCSI-ID (like Pioneer 18 CD or Sony CDZ-R360), all
possible selections will be listed in this field. If the robot is a serial line
(as with Kubik- or NSM jukeboxes), the available serial interfaces and Robot
IDs will be listed. See section "Robot set-up" on page 60. Select the
appropriate robot from the list.
If no robot is to be specified (e. g., Pioneer 6), this field is greyed
out.
Drives/Files
Each drive of a jukebox (or one or more files for a hard disk image) must be
specified. Click [ADD...], to select the drives or files. Click
[REMOVE LAST DRIVE] to remove the last drive of the list. To change the
properties of the defined drive, select the drive from the list and click
[DEFINE DRIVE].
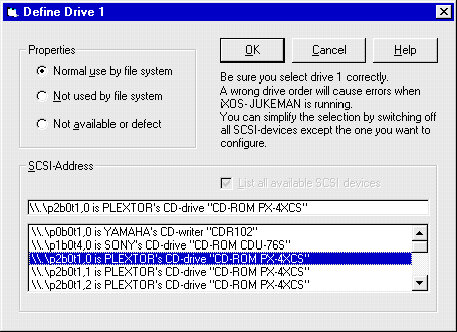
The 'Define Drive' dialog lists all drives available, including the entry
defective/missing for defect or missing devices. If, for example, the
second drive of your jukebox is missing or not working, the second drive must
be defined as defective/missing to assure the drives are accessed
properly.
The drives must be added in the same order of the drives in the jukebox. In the
"Properties" group in the upper left of the dialog, you can select the
properties of the drive:
* Not available or defect is the same as defective/missing.
* Not used by file system can be selected for drives that will be
dedicated to writing disks (see "Production of CDs in jukeboxes" on page
145).
* In all other cases select Normal use by file system.
These drive properties can be changed at a later time by double-clicking on a
drive in the device definition dialog.
Click [OK] to define the drive. Click [CANCEL] to discard the
changes.
Confirming or discarding the device set-up
Click [OK] to confirm the device set-up. If the server was stopped, it
can be restarted with [SERVICE]-START JUKEBOX SERVICE. The devices
marked as "Attach at Server Start" will be attached. All specified slots
will be scanned for disks, and the directory structure will be stored in the
directory cache. This may take a while, depending on the type of jukebox and
the number of slots to be read.
Click [CANCEL] to discard the set-up.
Use a text editor to create a file "<name>.dev" in the
JUKEMAN directory. Choose a <name> that gives a hint about the
configured device (e. g., mercury or tower).
Enter the following lines in the file:
device=<type>
<type> is the type of device to be configured. See "Table 3 -
Device types for all supported jukeboxes" on page 57.
drive=<path>
Each drive must be specified with a line of this format. The order of
the drive numbers is important, not the order of the SCSI IDs. The "="
may be followed by a "!", "-" or a "*". The meaning
of these characters is described in "Drive set-up" on page 58.
<path> is the unique path of a SCSI ID for each drive. A detailed
description of SCSI ID representation can be found in "SCSI devices and device
names" on page 52.
robot=<rob>[,<robid>]
The parameter <rob> specifies the robot (SCSI-ID/LUN or serial
interface) of the device. For NSM jukeboxes the parameter <robid>
must be specified. See "Robot set-up" on page 60 for more information.
[sides=2]
This line must only be specifed if the device uses double-sided disks
(e, g., WORMs).
[disks=<slots>]
This line must only be specified, if you do not want to use all slots of a
jukebox. The syntax for <slots> is described in "Slot set-up" on
page 59.
[save=<savefile>]
If you enter this line, iXOS-JUKEMAN will create a file <savefile>
that stores which disk is in which slot when the jukebox is attached for the
first time. The name of the <savefile> should be the
<name> of the device with the extension .sav (see also
"Save file set-up" on page 60.
If all lines are entered, save the file
"<name>.dev".
The section "Attach devices automatically" on page 106 tells you how to
configure the server to attach one or more devices automatically at
start-up.
If you have created a device description file named device.dev, the
device can be attached with the command
cdadm attach device
The server will inspect the specified slots and present the disks to the views of the file system. iXOS-JUKEMAN will do this inspection if the devices are attached for the first time or if you attach a device that has no save file specified.